Dropzone Commander: UCM vs Scourge - Playthrough
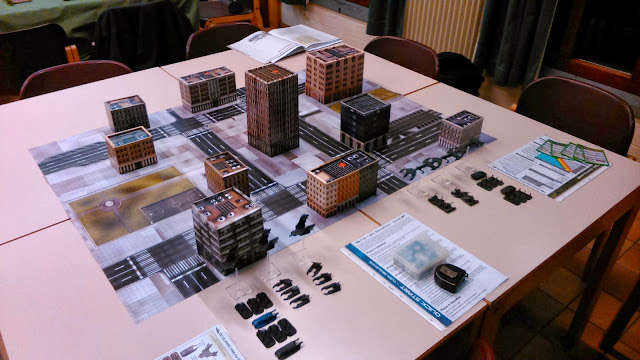
It is time to introduce Dropzone Commander to my gaming Club and they were more than happy to give this game a shot. So I set up the game using the starters set and invited all the members to come looking! 2 volunteers were chosen to play while I moderated. After explaining the basic mechanics and tactics most of the rules were clear and they were off to the Dropzone.
 |
| Table setup |
What did we bring?
Since we're playing with the starters box, the lists were as following
UCM (United Colonies of Mankind)
- Condor (Aircraft Transport)
- Bear (APC Transport)
- 3x Colonial Legionnaire Squad (Troop)
- Bear
- 3x Colonial Legionnaire Squad (Troop)
- Condor (Aircraft Transport)
- 3x Rapier (Tank AA)
- Condor (Aircraft Transport)
- 3x Sabre (Tank)
The Scourge
- Marauder (Aircraft Transport)
- Invader (APC Transport)
- 3x Warrior Horde (Troop)
- Invader (APC Transport)
- 3x Warrior Horde (Troop)
- Marauder (Aircraft Transport)
- 3x Reaper (Tank AA)
- Marauder (Aircraft Transport)
- 3x Hunter (Tank)
As you can see, both lists are balanced, and contain the most essential items to have a fun fight. Once the players got acquainted with their models the roll-off started.
Round 1 - 2: Deploying the forces!
UCM got first initiative and made a dash for the middle objective. Hiding their Troops behind the center building trying to hide from the Scourge who are taking their time making a flank move. At the following term, the UCM makes an agressive move by positioning their anti-air in an open spot, trying to create a suppressive line for the Scourge to come closer. They aren't impressed and land their troops to the side of a building, out of sight of any UCM troops.
 |
| Condor dropping his cargo |
Round 3 - 4
As the UCM makes their way into the building they immediately find the objective. Feeling invincible they take up fort in the building in the centre. Unfortunately the Scourge makes a devastating advance, and destroys their transports. Leaving them with only Bears to get out. The Rapiers are taken out by some lucky rolls on the Scourge side, while the UCM over estimates their range failing to hit target twice. Thus paying with most of their life.
The Scourge troops, being ignored by most of the UCM happens to stumble on the objective in the meantime.
 |
| In the heat of the battle |
Round 5 - 6
Both troops seem to remember they have to get that objective off the field, and start their 'tactical retreat'. The UCM tries to take the transports down with their superior range, but react to late, and are left in the dust of the speeding Scourge transports that just zoom off the board with superior mobility. The UCM troops that boarded the Bear tried to leave the board, being chased by the remaining Scourge tanks, but didn't make it to the edge. Luckily they did survive.
 |
| Late retreat by the UCM |
Afterthoughts
Since the Scourge got away with one objective, the endscore was UCM 1 - 2 Scourge. This result wasn't expected at first since the Scourge was really hanging back. Thought them striking at the correct moment, and the UCM failing at most of their shooting, gave them the upper hand. We all learned not only to take into account that you CAN'T measure shooting distances, but also the different strenghts of the armies. We're still learning the finer tricks, but responding to different situations is what makes this game interesting!


Comments